Xamarin Forms development stack is awesome framework for developing cross-platform mobile applications. On one hand, being Xamarin developer has many benefits over other mobile development stacks. But, on the other hand, developing cross-platform application can be frustrating, because I need to know internals and tricks for all targeting platforms.
One of the tasks every developer must sooner or later deal with is signing of binaries before deploying. Apple iOS and Google Android have slightly different approaches here. As a Xamarin developer I must know both of them if I want to target my app to iOS and Android.
In this blog post I will focus how to create signing certificates and sign Android app to be ready for publishing to Google Play.
In one of the next blog post I will also present how to deal with iOS. How to create certificates, provisioning profiles, sign IPA and deploy to store.
So, let’s start. First, let’s take a look at Android.
Signing applications for Android
Android requires that all apps be digitally signed with a certificate before they can be installed. Android uses this certificate to identify the author or creator of an application. Certificate does not need to be signed by a certificate authority – it can be simply signed (and often are)with self-signed certificate. The app developer holds the certificate’s private key.
When signing your app, the signing tool attaches the certificate to your app. The certificate associates the APK or app bundle to you and your corresponding private key. This helps Android ensure that any future updates to your app are authentic and come from the original author. The key used to create this certificate is called the app signing key.
For more information about Android app signing check this link: https://developer.android.com/studio/publish/app-signing.
Creating key-pairs to sign Android APK
If I want to sign Android application I use keytool program which ships with Java JDK toolset to achieve this task. This tool is used for managing a keystore (database) of cryptographic keys, X.509 certificate chains, and trusted certificates.
I can use more interactive approach to create certificate, by:
|
1 2 3 4 5 6 7 8 |
"C:\Program Files (x86)\Java\jdk1.8.0_131\jre\bin\keytool.exe" -genkeypair -v -keystore JenxApp.keystore -alias JenxApp -keyalg RSA -keysize 2048 -validity 10000 pass = xxxxxx what is your first and last name: John Doe What is the name of your organizational unit : MyCompany Ltd What is the name of your City or Locality : New York What is the name of your State or Province : United States What is the two-letter country code for this unit : us |
or all-the-way command, by providing -dname parameter (distinguished name):
|
1 |
"C:\Program Files (x86)\Java\jdk1.8.0_131\jre\bin\keytool.exe" -genkeypair -dname "CN=John Doe, OU=MyCompany Ltd, O=MyCompany, L=New York, S=United States, C=US" -v -keystore JenxApp.keystore -alias JenxApp -keyalg RSA -keysize 2048 -validity 10000 |
The output is *.keystore file which contains public and associated private key for signing the APK.
You can find more info about the tool here: https://docs.oracle.com/javase/8/docs/technotes/tools/windows/keytool.html.
Now, that I have self-signed certificate ready I can use it to sign my Android APK.
Signing
Next, I will show how to sign Android output APK with msbuild. Basically, I will use SignAndroidPackage msbuild target to sign APK of my Xamarin Forms Android csproj. Here are the input parameters passed to my msbuild engine:
|
1 2 3 4 5 6 |
/t:SignAndroidPackage /p:AndroidKeyStore=true /p:AndroidSigningKeyAlias=$(JenxAndroidSigningKeyAlias) /p:AndroidSigningKeyPass=$(JenxAndroidKeyStorePass) /p:AndroidSigningKeyStore="$(Build.SourcesDirectory)/build/jenx-app/JenxApp.keystore" /p:AndroidSigningStorePass=$(JenxAndroidKeyStorePass) |
On my Azure DevOps build pipeline, my YAML task code looks like this:
|
1 2 3 4 5 6 7 8 9 10 11 12 13 14 15 |
variables: BuildPlatform1: 'anycpu' BuildConfiguration: 'release' JenxAndroidSigningKeyAlias: 'JenxApp' JenxAndroidKeyStorePass: 'xxxxxxxxx' steps: - task: MSBuild@1 displayName: 'Build and Sign JenxApp Android Apk' inputs: solution: src/Jenx.Android.JenxApp/Jenx.Android.JenxApp.csproj msbuildArchitecture: x64 platform: '$(BuildPlatform1)' configuration: '$(BuildConfiguration)' msbuildArguments: '/t:SignAndroidPackage /p:AndroidKeyStore=true /p:AndroidSigningKeyAlias=$(JenxAndroidSigningKeyAlias) /p:AndroidSigningKeyPass=$(JenxAndroidKeyStorePass) /p:AndroidSigningKeyStore="$(Build.SourcesDirectory)/build/jenx-app/JenxApp.keystore" /p:AndroidSigningStorePass=$(JenxAndroidKeyStorePass)' |
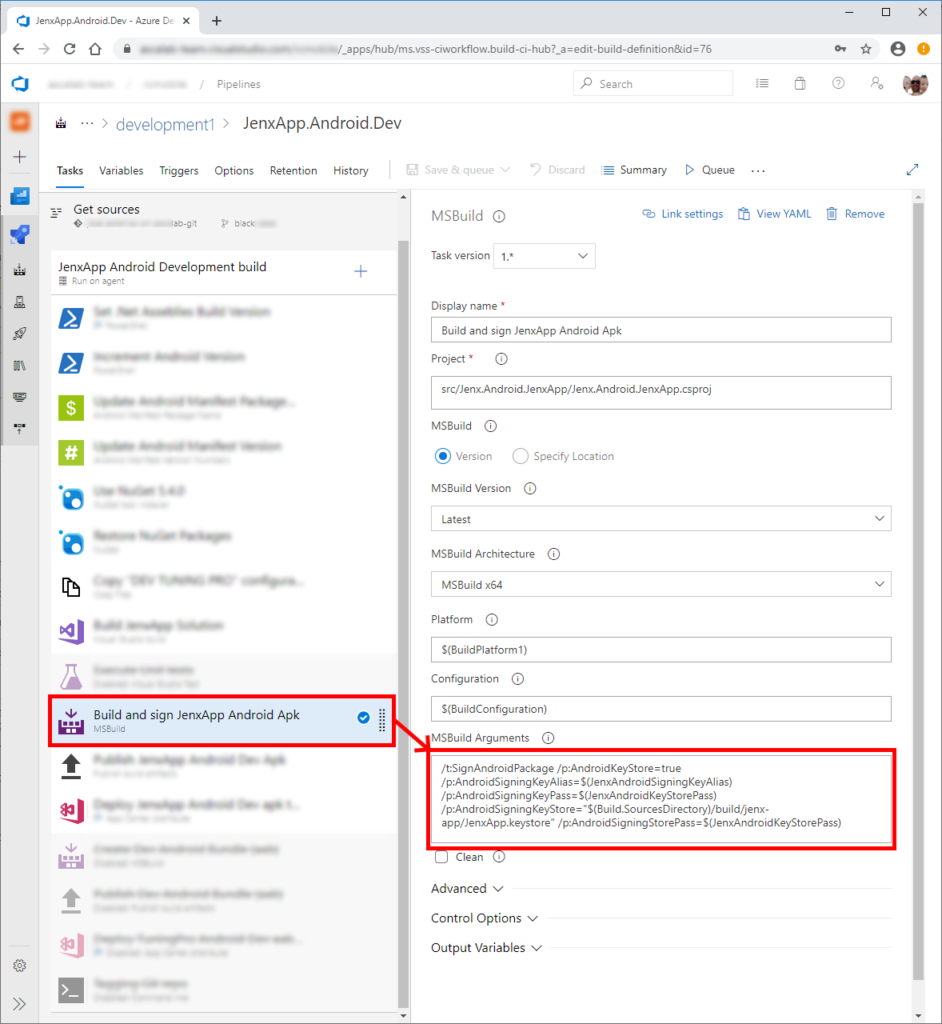
Or, if you prefer, in Visual Azure DevOps pipeline editor:

Here you go. My Android APK is created and signed. It’s ready to start testing or to publish to Google App Play. In my case presented here, I can find my signed APK at:
|
1 |
$(Build.SourcesDirectory)/src/Jenx.Android.JenxApp/bin/$(BuildConfiguration)/$(JenxAppAndroidPackageName)-Signed.apk |
where, in my case, $(BuildConfiguration) and $(JenxAppAndroidPackageName) are build variables. First defines build configuration (Debug/Release), second defines Android application package name defined in Android Manifest file.
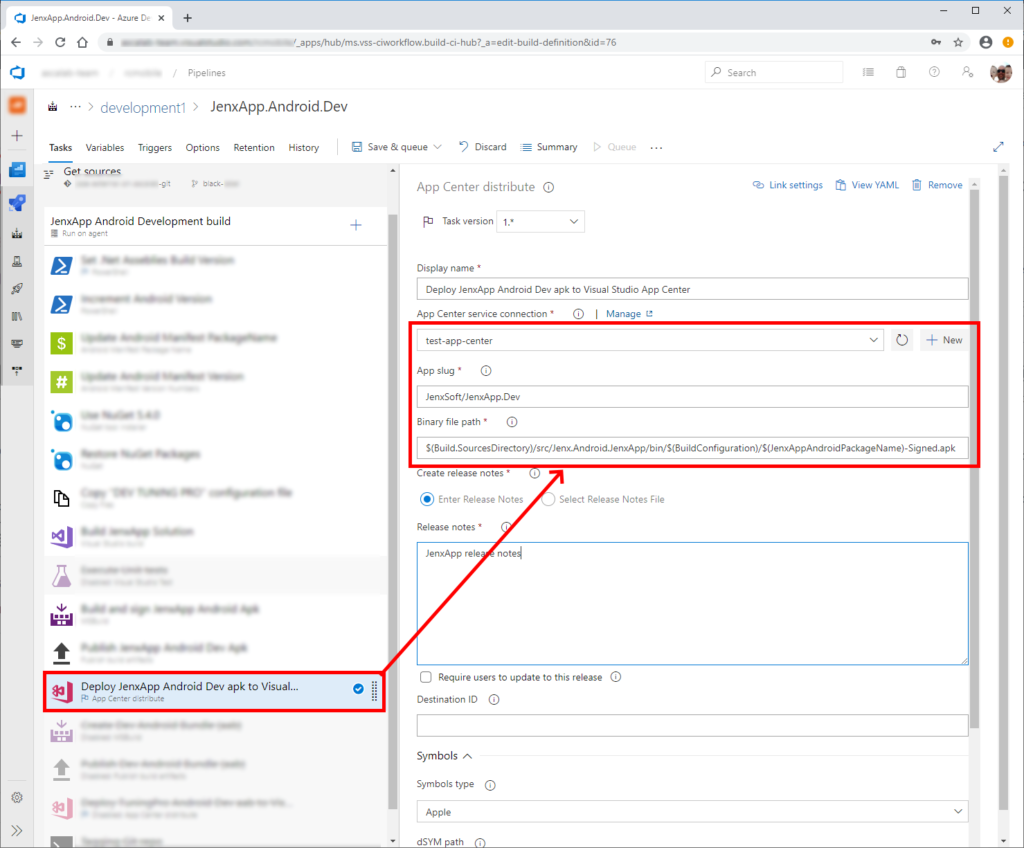
Now, that I have signed APK I can play around with it. For example, I can push it to my App Center channel for testing, and from there – when ready – I can push directly to Google Play. For example, next picture depicts pushing my signed APK to App Center.

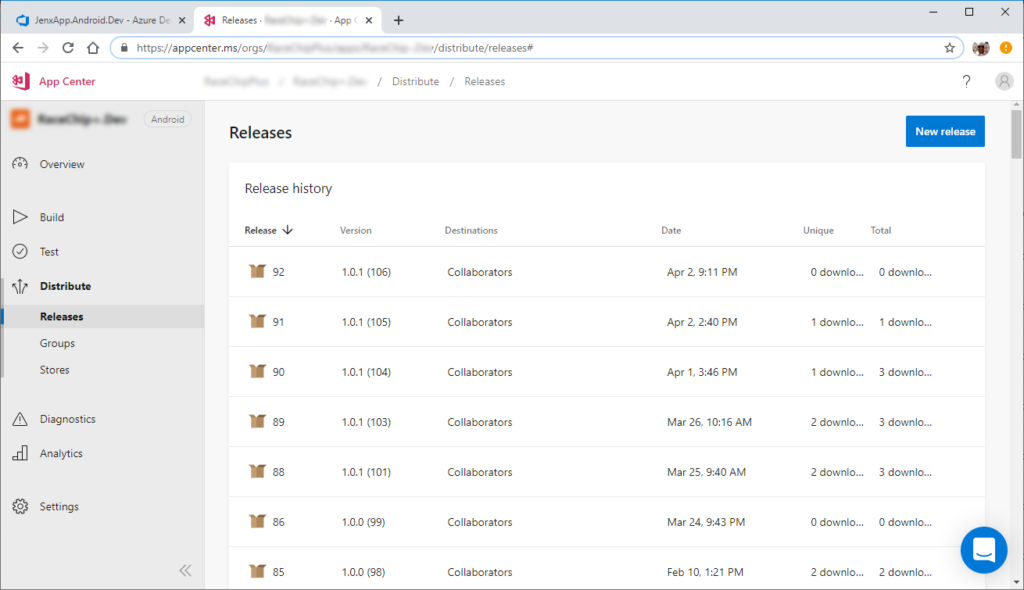
Voila, my Android APK pushed to my testing App Center app channel. I can start testing. When my app is tested I can simply push my app to Google Play.

Conclusion
In this blog post I presented how to create self-signed certificate and how to sign Android app. After signing, application can be publish on Google Store or pushed on App Center for testing -as shown also in this blog post.
Until the next post, happy coding.


One thought on “Xamarin Forms developers: How to sign Android APK”